How I Built My Hexo Blog: A Step-by-Step Guide
Intro
🚀 Hexo is a powerful static site generator that makes blogging simple and fast.
In this step-by-step guide, I’ll show you how to build your own Hexo blog using:
✅ Hexo – Static site generator
✅ Git & GitHub – Version control & hosting
✅ Vercel – Free, fast web hosting
✅ VS Code – Easy Markdown editing
✅ Namecheap – Custom domain setup
🛠 Prerequisites
Before we begin, make sure you have:
- Node.js installed (we’ll install it in the next step).
- GitHub account (for hosting).
- Vercel account (for free hosting).
- VS Code installed (recommended for easy editing).
- Namecheap account (for purchasing a custom domain).
🚀 Step 1: Install Node.js
Hexo runs on Node.js, so we need to install it first.
1️⃣ Download Node.js LTS from the official website.
2️⃣ Run the installer (just click Next for default settings).
3️⃣ Open VS Code and open a new terminal (Ctrl + ~ on Windows/Linux, Cmd + ~ on Mac).
4️⃣ Check if Node.js is installed:
1 | node -v # Should show something like v18.14.0 |
Step 1: Installing Node.js
Hexo is powered by Node.js, so you’ll need to install it first:
- Visit the Node.js download page.
- Choose the LTS version (recommended for stability).
- Run the installer and verify the installation:
Step 2: Installing Hexo CLI
Once Node.js is installed, use npm to install Hexo’s command-line interface globally:
1 | npm install -g hexo-cli |
Step 3: Creating a New Hexo Site
- Navigate to your projects folder in the terminal.
- Initialize your blog:
1 | hexo init my-blog |
This creates a scaffold with default themes and configurations.
Step 4: Installing Dependencies
Install required packages defined in package.json:
1 | npm install |
Step 5: Running the Local Server
Preview your blog locally:
1 | npm run server |
Visit http://localhost:4000 to see your blog in action.
💡 Tip: Press Ctrl + C in the terminal to stop the server.
Step 6: Creating Your First Post
Generate a new Markdown file for a blog post:
This creates source/_posts/my-first-post.md. Open the file to edit:
1 | --- |
Note: Front-matter (the YAML section at the top) defines metadata like titles and tags.
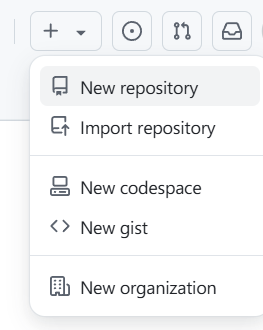
Step 7: Version Control with Git
Use VSCode open the hexo site folder. Click Source Control - Initialize Git Repo. Commit your files.
Create a Repo in GitHub.
Pushing the Repository to GitHub
To push my local repository to GitHub, I ran:
1 | git remote add origin <repository-url> |
Step 8: Linking GitHub to Vercel
Signed up for a Vercel account and connected my GitHub repository to it.
Deploying to Vercel
- I created a new project in Vercel.
- Selected the GitHub repository I linked.
- Followed the prompts to deploy my site.
Once deployed, Vercel provided a default URL where my blog was hosted.
Step 9: Buying a Domain Name at Namecheap
Since I wanted a custom domain, I purchased one from Namecheap.
- to find a cheap domain, try to search for some unique and personal names.
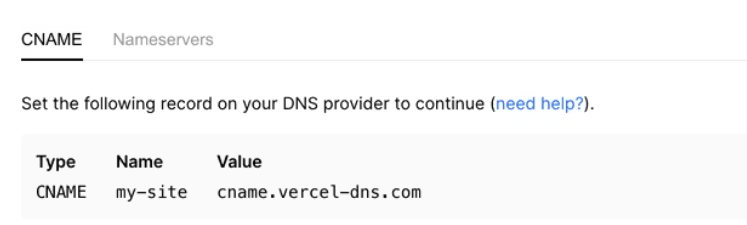
Setting Up DNS at Namecheap
To link my domain to Vercel, I:
- Went to my Namecheap account and accessed the domain’s DNS settings.
- Added a CNAME or A record pointing to my Vercel project.
- Followed the Vercel custom domain guide.
Apex Domain

Subdomain